Sanding Shims
 My father and I didn’t start out using sanding shims when we created large intarsia projects for commercial installations. We would sand one piece, put it back in place and mark where it joined the next part. Then try to sand the next part down to the line as close as possible. It was years later we came up with the idea of sanding groups of pieces together as one unit.
That's me under the hat, mask, and eye protection. We didn't have a dust collector at that time.
Download "Using Sanding Shims" Tips
The concept “sanding shim” is a term I use to describe a method for sanding many pieces of wood together. I cut a piece of flat plywood or masonite roughly the shape of the parts that I want to sand together. I use Light Traffic Double-Sided Carpet tape to hold the parts to the masonite (or plywood). This is temporary, after the parts are sanded they are removed from the “sanding shim”. The raising shims are a permanent part of the project.
When I shape the pieces my goal is to make it look as real as possible. For example if I were sanding a horse with a white blaze, a color change on the coat does not mean the contour changes. After the parts are sanded they are removed from the sanding shim and I hand sand a very slight bevel around the edges of the parts.
![]()
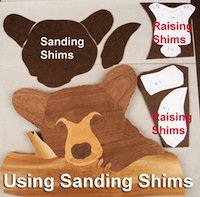
Sanding shims comes in handy when you need to blend raised areas. Using the raccoon as an example, it has two raising shims under the nose area to make it more dimensional. The raised nose needs to blend in with the forehead, so it doesn't look like it has a stair-step shaped nose. I use double-sided light duty carpet tape to hold the parts onto the sanding shim, making sure the raising shims are taped in place before sanding.![]() I use an inexpensive “light duty” carpet tape. You will need at least two pieces of tape to hold each part down. It is best to put the tape on the back of the parts, it is easier to see where to put the tape. Otherwise you practically have to cover the entire surface of the sanding shim with tape to ensure each part has tape. I really do not like to use that much tape, it makes it much harder to take the parts off the shim without breaking anything.
I use an inexpensive “light duty” carpet tape. You will need at least two pieces of tape to hold each part down. It is best to put the tape on the back of the parts, it is easier to see where to put the tape. Otherwise you practically have to cover the entire surface of the sanding shim with tape to ensure each part has tape. I really do not like to use that much tape, it makes it much harder to take the parts off the shim without breaking anything. ![]()
If there are more than one raising shim stacked up it is going to be easier to put the tape on each raising shim and the sanding shim. Then you have to carefully assemble the parts making sure the raising shims don’t interfere with the placement of the parts. The trick to this is not pressing anything down firmly until everything is in place.
If you have trouble keeping the parts on your sanding shim there may be several reasons.
One problem is the sanding shim is not flat or the parts were dusty and the tape did not make a good bond, or there isn’t enough tape to hold the part down, and last but not least perhaps you are pressing too hard against the sander.
![]() An example of parts taped on the "sanding shim" starting to "rough in" the project. Taping all the parts to the sanding shim not only saves time but it will make the project look more realistic.
An example of parts taped on the "sanding shim" starting to "rough in" the project. Taping all the parts to the sanding shim not only saves time but it will make the project look more realistic. 
The giraffe is a perfect example.
As mentioned above this technique makes it easier to blend raised areas. Another benefit is being able to see the entire face as you sand the surface. After the parts are roughed in they are taken off the sanding shim.

We see many intarsia projects that have each part heavily rounded. It gives the project a quilted feel and accentuates each part that makes up the picture. There is nothing wrong with this, it is more of a personal sanding choice that each person must decide how they want their projects to look.
As mentioned above I have a realistic goal in mind. I think if each piece is heavily rounded the first thing you notice is all the different pieces of wood.
If they are sanded realistically you see the completed piece and then you realize it is made up of many pieces of wood.

Another thought to keep in mind is balance. It can look redundant to have every part heavily rounded. To balance the project I like to have some mellow contours to help accentuate the more rounded parts.
On the Big Foot Clown, the fingers really stand out next to the flat soles of the shoes. The hair is more flat to help make the face look more dimensional. The face has a mellow contour to help make the nose stand out more. The same with the hat, it has a mellow contour, which makes the ball on top look much rounder than it is.

Photos of the I-304 Chocolate Lab sanding and raising shims.
Start the Taping Process /Gradually Build the Face
Raising Shims and Sanding Shims for the Lab. Cut the raising shims slightly smaller than the raised parts. The sanding shims are cut close to the actual size of the parts. Use a copy of the pattern to make the shims.
Apply tape to the sanding shims, look at the pattern for placement of the tape. I applied tape to the back of the ears then put the sanding shim on top. Apply tape to the neck sanding shim, I left out parts 41,42,43 in order to sand these parts individually. I marked the placement of those parts on the shim to help align the rest of the parts. Peel the paper off the neck sanding shim. Place the neck sections using the lines drawn for parts 41-43.
Place a copy of the pattern down first, then put the ears and neck sections in place. Remove the paper from the tape on the face sanding shim and carefully place it between the ears and the neck sections. These will help line up the parts to place the raising shims in the correct place. I put the first shim on top of the dog face parts, everything exposed will be placed on top of the sanding shim. Peel the paper off the tape and put the 1st raising shim in place. Put the 2nd raising shim on top of the remaining parts, place the exposed parts (eye areas and lower two jowl pieces) on top of the 1st shim. Place the 3rd shim on top of the remaining parts, put the exposed parts in place (15, 33, & 27). Peel the paper off the 3rd shim then put it in place. Then the nose shim along with the nose will be last.

6 Responses
Judy
ANDY CLARK
February 08, 2021
Do you have any tips on best ways to sand pieces to get correct curvature, i’m just getting back into same. Thanks
I always have a light source close to where I’m sanding, After a little sanding I hold it up to the light (like it would be hanging on the wall) and see if it is catching the light or making a shadow – depending on what I want. Another thing I like to do is take a photo of the piece and look at it on my computer, sometimes seeing it in different format helps me to see if I need to sand more or not.
I search online for many photos of the subject matter and do my best to make it look like the animal, person, or thing that I am making.
Judy
I am very new to the intarsia world, am currently working on my 4th project, the wild burro. I understand the goal / purpose of the sanding shims, but in the picture that came with the pattern it looks like risers were used but the pattern does not call for them. I think I could do this either way, have used like 3/4" wood or more on the entire thing, which allows me thickness for contouring / shaping. I am now though second guessing my riser thought and thinking this wild burro is a “contouring/shaping” challenge? Is that correct ? I feel like with intarsia there is no " right or wrong" it’s kind of in the eye of the beholder, but for first time doing a project and new to it, I prefer to follow your notes and tips off the patterns. You are the pro. Have purchased several patterns of yours and am enjoying them. I feel like each one offers different challenges.
If the pattern does not call for raising shims, I didn’t use them. It’s just in the shaping that makes it look like it’s been raised. If the part has an exterior edge It’s harder to raise because you will see the shim from the side of the piece. I have been known to cut a shim out of the same wood (that I am raising) and glue the shim to the back of the piece.

Deb Delany
I am very new to the intarsia world, am currently working on my 4th project, the wild burro. I understand the goal / purpose of the sanding shims, but in the picture that came with the pattern it looks like risers were used but the pattern does not call for them. I think I could do this either way, have used like 3/4" wood or more on the entire thing, which allows me thickness for contouring / shaping. I am now though second guessing my riser thought and thinking this wild burro is a “contouring/shaping” challenge? Is that correct ? I feel like with intarsia there is no " right or wrong" it’s kind of in the eye of the beholder, but for first time doing a project and new to it, I prefer to follow your notes and tips off the patterns. You are the pro. Have purchased several patterns of yours and am enjoying them. I feel like each one offers different challenges.

andy clark
Do you have any tips on best ways to sand pieces to get correct curvature, i’m just getting back into same. Thanks

Gary Gardin
I really appreciate how complete your descripions are and the reasons for doing them. I did the racoon following your directions to a tee and have had many compliments. Looking forward to doing many more! When I go to wood shows I see examples of intarsia but the end product is completely flat with no contouring whatsoever. Nice but not great. Contouring makes all the difference.

Ron Carey
Thank you for the concise description. Sanding and shaping the way you do your pieces look so realistic. Fantastic tips to help maximize what wood we have available to add thickness-depth to our projects. I as a beginner love to learn especially in these separate socially distant times!!
Leave a comment
Comments will be approved before showing up.


Judy Roberts
Author